I promised NGillespie10 I would post up pics and instructions on the latest blind setup. There are cost savings tips at the end.
In the first pic is most of the materials used in the construction. Not pictured are the aluminum paint poles, camo material, pop rivets, or the electricians fish tape.
To make the three legs:
Insert the bolt (3/8" X 10") into the brass tubing-to-thread coupling (3/8" tube X 3/4" male hose) with the head of the bolt inside the fitting. Other fitting also work. The threads and shank of the bolt will be sticking out and used for the spike. Drill a hole through the center of the brass and bolt as close to the base as possible (to avoid snagging on the burlap) and insert a 1/8" spring pin to secure the bolt. Now sharpen the threads to a point for easy sticking into the ground. Screw the fitting into a thread-to-socket weld (3/4" X 3/4") PVC fitting.
Here are the components being put together.
Now that you have the spikes you can use anything that will fit into a 3/4" PVC fitting. EMT conduit, PVC pipe, or whatever. I used the lightest aluminum 4' x 8' adjustable paint pole I could find and cut them down to 35" sections. This gives a height adjustment of 38" to 68". I pop riveted the 1" larger section into the 3/4" PVC fitting. The actual hole size in a 3/4" PVC fitting is just over 1" so your leg material needs to be a 1".
OK, now for the hoop.
I have tried everything I can think of to make the hoop so it is collapsible AND does NOT retain memory of it's collapsed form when it is open. The best I have found is 1/2" black poly pipe rated for 125 psi. I inserted 25' of electricians fish tape inside the pipe to give it the needed support for no memory. Just bend one end a little so it doesn't get caught on the fittings and insert through twice and then connect the last fitting.
I cut three lengths of black pipe 48" and insert the 1/2" tees forming a loop. Use a heat gun or heat source to warm the tube before you insert and it will oversize the tubing allowing it to later slip when collapsing. The barbs will hold it together (tried sanding barbs off, didn't work well unless us use shock cord inside). While the tube is still warm rotate the fitting to expand and cut groves to give a tight yet movable joint. You can find all of this on the net by searching for "Hoop Making". This hoop can be collapsed into a figure "8". Again see "Hoop Making".
Sew the camo onto the hoop. 12' section of burlap camo from Walmart is just barely enough. Longer would be nice but it will work. I used a "Latch Hook" ($2) from the craft store and some jute twine. I wrapped it in spiral form around the hoop and burlap forming a continuous circle. Twelve feet will not quite reach itself with this size hoop so sew the bottom together with approx the same space at the top. leave the opening for a door.
Now to put it all together and add the finishing touches.
Depending on the size of the top of you legs the 1/2" Ts on the hoop may need to be adjusted to fit properly. I cut a short piece of poly and inserted it on the T so it would fit snugly into the top of the of the paint pole.
I permanently attached 6' tether lines to the 3 T's with loops on the ends for stakes if the ground is really soft or for high winds. We are finding with the 10" spike in the ground the tether lines are rarely needed.
I use brown pipe cleaner attached to the rim of the hoop to tie brush onto the top. It works great. I attach them about ever 8" or so. They are by far the fastest way to tie up brush we have found. Just twist once and go!
Now for assembly.
Unfolded hoop with the pole stuck in the ground near the T's.
Sit the hoop onto the poles.
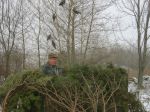
Brush in using the pipe cleaners to tie the brush. TIP... cut the limbs long enough to rest on the ground and still hang over the top of the blind. Resting on the ground will take some of the weight off the hoop and prevent sagging. Hanging over will create a hole for you to hide in and under. All that sicks up is your beady little eyes and the barrel.
This is couple of pics of the blind folded and then stored in a laundry bag. In the bag is a pair of loppers, 6 full bodied decoys, 6 Boondockers and a Buster II with room left over for coat or whatever.
Cost savings.
The electricians fish tape can be eliminated or could possible be found for free as local electricians are always breaking these.
100' roll of 1/2 poly pipe at Lowes is $18 and fittings are less that $1 each and cheaper if bought in packs. Have a buddy go in with you on this. I tried other sizes and psi and MANY different materials but this one works the best. At the local hardware stores this pipe is sold by the foot but a role for one of the box stores may be cheaper.
Legs could be made from anything sturdy enough to hold up the blind. PVC may work as could EMT and others that can be found on construction sites for the asking. The cheapest and best you could find would be a bamboo thicket if they grow in your area. If you don't have a spike on it the tether lines will become a must.
Old sheets could be stained up using a old paint diluted into water to make a "wash". Just use what you can find or acrylics at the craft store are only a couple of bucks. Get darker colors that you need as the pigment will dilute when the water is added for the "Wash".
Good luck and good shooting.
-- Edited by 8fishermen on Monday 2nd of January 2012 09:41:21 PM
__________________
"If money can fix it, it ain't broke" The great theologian and my crow hunting partner AW.
Here is a video of the blind being set up and brushed in. Only 2/3 of the hoop is brushed in and only one tether line anchored in the video but all could be set up and brushed in 5 minuets.
Be nice as this is my first attempt at a video and was taken with a cell phone.
Love this idea. Going to build mine tonight. I have a couple of ideas I am going to use. They may improve and they may not. Plan on tesing them out this weekend.
Will post pics when finished.
__________________
I hunt therefore I am!
If you are not stepping forward, you are stepping backwards. Time stands still no for No Man.
Thanks for the offer, I will PM you before I begin to purchase stuff. Scouting out materials now.
I do not (yet - someday...) have a pick-um-up truck. So I am sadly, cross-country challenged. "Mechanized" is the way to go.
However, I usually carry my stuff in a 100 -200 yards anyway, because I think the crows have my car and plate on record and stay away when they see it. Seriously, I believe they associate the vehicle with some degree of mayhem if I shoot a location too often, even being a not-so-hot shotgunner. The last AUG-SEP season here, I was using a section of camo cloth attached to trees. It is quite portable and worked pretty well, but did not shield me from the rear or from the above. Your design seems as if it will solve those problems. Also, I want to move away from the treelines. They're able to hide above and behind.
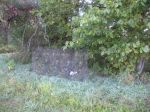
Photo is of the current camo cloth setup. Again, works well in a treeline, when wearing camo also, except as stated.
(afterthought: I did hide the white bag that shows up so well...)
-- Edited by Old Artilleryman on Monday 26th of November 2012 01:11:34 AM
Right Bob. I admire your setup as the premier 5-star rig.
The appeal to me of 8fisherman's portable rig is that it is a one-person set-up--the usual way that I hunt. I really like both, but I can only haul so much by myself. In any case, the gear pile is growing and growing.
67 days to the next MI crow season!
__________________
"Arms are the only true badges of liberty. The possession of arms is the distinction of a free man from a slave." -- Andrew Fletcher 1698
Right Bob. I admire your setup as the premier 5-star rig.
The appeal to me of 8fisherman's portable rig is that it is a one-person set-up--the usual way that I hunt. I really like both, but I can only haul so much by myself. In any case, the gear pile is growing and growing.
67 days to the next MI crow season!
Bob has a one man version also. 4' X 4' single and 4' X 6' double. His are 4 metal ridgid framed panels that pin together. I look very closely at his when designing these. The problem I came to with the panels was portability. He is able to drive to his locations. We do not have that ability here. The world here will turn to a mud bog in a couple of weeks so getting them into the field was the problem. If you can drive to your location, the panel blinds are the way to go. They set up very fast and are very stable. I think Bob even has a rack built into his camper shell on his truck to hold the blinds in the top of it. Very convenient.
pm me if you decide to build one.
Good luck.
__________________
"If money can fix it, it ain't broke" The great theologian and my crow hunting partner AW.


 and the barrel.